Getting used to producing content for VR has a bit of a learning curve. It takes more than just great 360 cameras to make well-produced and professional content in this medium. You need to be able to think outside the frame and figure out new ways to work with film, instead of just using traditional production techniques.
It all starts with choosing the right tool for the job. It’s important to think about different 360 cameras like different lenses. You wouldn’t use the same lens for every job, would you? Each project may present unique challenges that require a different perspective, and you’ll want to explore all possible options for hardware.
Choosing the Right Camera
First, you have to decide whether you’ll shoot stereoscopic (3D) or monoscopic (2D) content. Stereo provides a level of 3D depth with an enhanced sense of presence and can be important for creating a realistic environment for the VR headset. However, it can also have some limitations. You’ll need to carefully set each scene to optimize for the best distance to your subject in order to get a good stitch and the proper stereo effect. Monoscopic, though less immersive, is often easier to stitch in close quarters, and mono-only cameras are smaller, making them great for high-action or POV content.
You will also want to consider whether or not you’ll need to live broadcast your 360 video or post-produce it. Not all 360 cameras will offer broadcast-ready options with SDI support and Ethernet, and very few solutions can livestream stereoscopic footage at 4K per eye.
Resolution and frame rates are the next important considerations. Frame rates are particularly important for fast-moving content like extreme sports. Some cameras are capable of shooting at 60 or even 120 frames per second (fps), but may come with the tradeoff of less dynamic range. Finally, be mindful of your camera’s IP rating if you intend to use it outdoors or in harsh conditions.
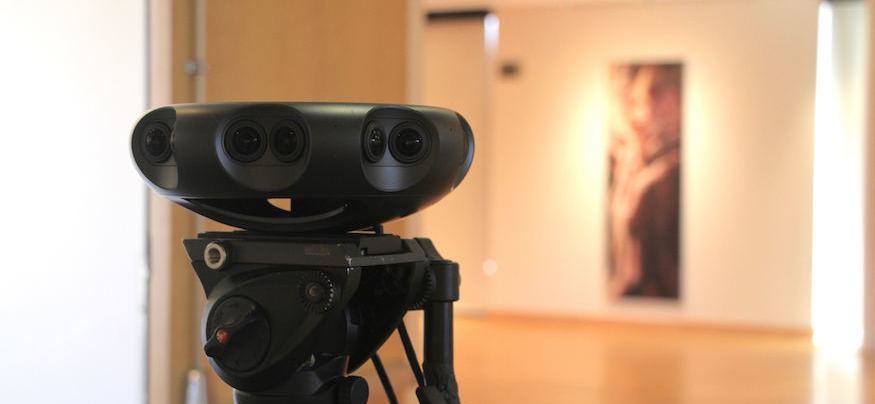
The Samsung 360 Round can stream or record stereoscopic 360 footage at 30 FPS at 4096 x 4096 pixels (or 4096 x 2048 per eye), or monoscopic 360 footage at 4096 x 2048. With its IP65 rating for dust and waterproofing, it can be a great choice for outside or industrial use cases, where the camera may be exposed to the elements.
Setting the Scene
Shooting stereoscopic content can present additional challenges with blocking talent. Depending on the specs of your camera, there may be a minimum interocular distance for the best stitching result. The effect of the stereo will also fall off the further away your subjects are from the camera. For narratives, you’ll want to raise it so it’s at eye level with your speaking subjects.
The Ultimate Guide to 360 Video Production
Everything you need to start creating 360 video, from pre-production to post and distribution. Download Now
Lighting scenes in 360 can be challenging due to the fact that you can’t just hide light stands outside of the frame. You can often conceal the sources of light by hiding them behind obstructions, or shoot clean plates of your scene so that lighting equipment can be easily removed in post. Cameras with good low light performance, wide aperture and luminance level controls can also be helpful for capturing low light in naturally lit scenes.
When working with practical light, frequency mismatches can cause flickering in your footage. You can alleviate this problem with manual control of shutter rates, or by implementing NTSC or PAL frame rates.
Essential Accessories
After you’ve looked at the camera, you’ll need reliable and fast media storage, a sturdy and versatile tripod and a power source.
You have several options for media storage including writing files to a solid-state drive (SSD) on your connected computer, through an external SSD connected to the camera, or through a single standard SD card. For SD cards, be sure that they support fast write speeds, since at least 90 MB/s is recommended.
When it comes to camera support, cinema tripods aren’t always a great fit for 360 production. You won’t need panning handles, because there’s no need to pan a 360 camera. Manufacturers like Matthews and Manfrotto offer tripod solutions designed for VR cameras, typically with a short and heavy-duty leg span and a long, extendable center column.
Review and Monitor While on Location
In the early days of 360 content creation, users didn’t have the luxury of being able to review shots and 360 composition on site. Thankfully, many cameras today offer the ability to monitor footage directly, even as a stitched scene.
The 360 round offers the ability to live monitor the video through its gigabit Ethernet port, either through a Windows-based computer with at least an Nvidia GeForce GTX 1060 card, or via the 360 Round Viewer mobile app.
If you aren’t able to bring a production-ready PC to the location, the 360 Round app will allow you to view a live preview of the camera in four unstitched segments and the up-facing camera. This can be great if you are in a pinch and want to verify that your settings are all in order.
Putting It All Together
Copying, importing and stitching 360 footage is easy, but keep in mind that system requirements can be demanding, especially for a live broadcast or stereoscopic 360 footage. Stitching this level of content will require at least an Nvidia GTX 1060 or better, and a live broadcast will require two GPUs.
When evaluating cameras, look at the available export options. You’ll want to know exactly how it transfers videos to software and if you need any additional processing capabilities.
The 360 video workflow is certainly much easier when you have an efficient turnkey solution that includes hardware, software, live monitoring on set and appropriate support equipment. Continuously using the camera will open the door to work effectively in a whole new way.
For a deeper dive, download our comprehensive guide to 360 video production.


